ADA Rules for Med Spa Treatment Rooms
Med spa ADA checklist: 36-inch accessible route, 32-inch door clear, 30x48 transfer zone, 60-inch turning space, no blocked equipment.
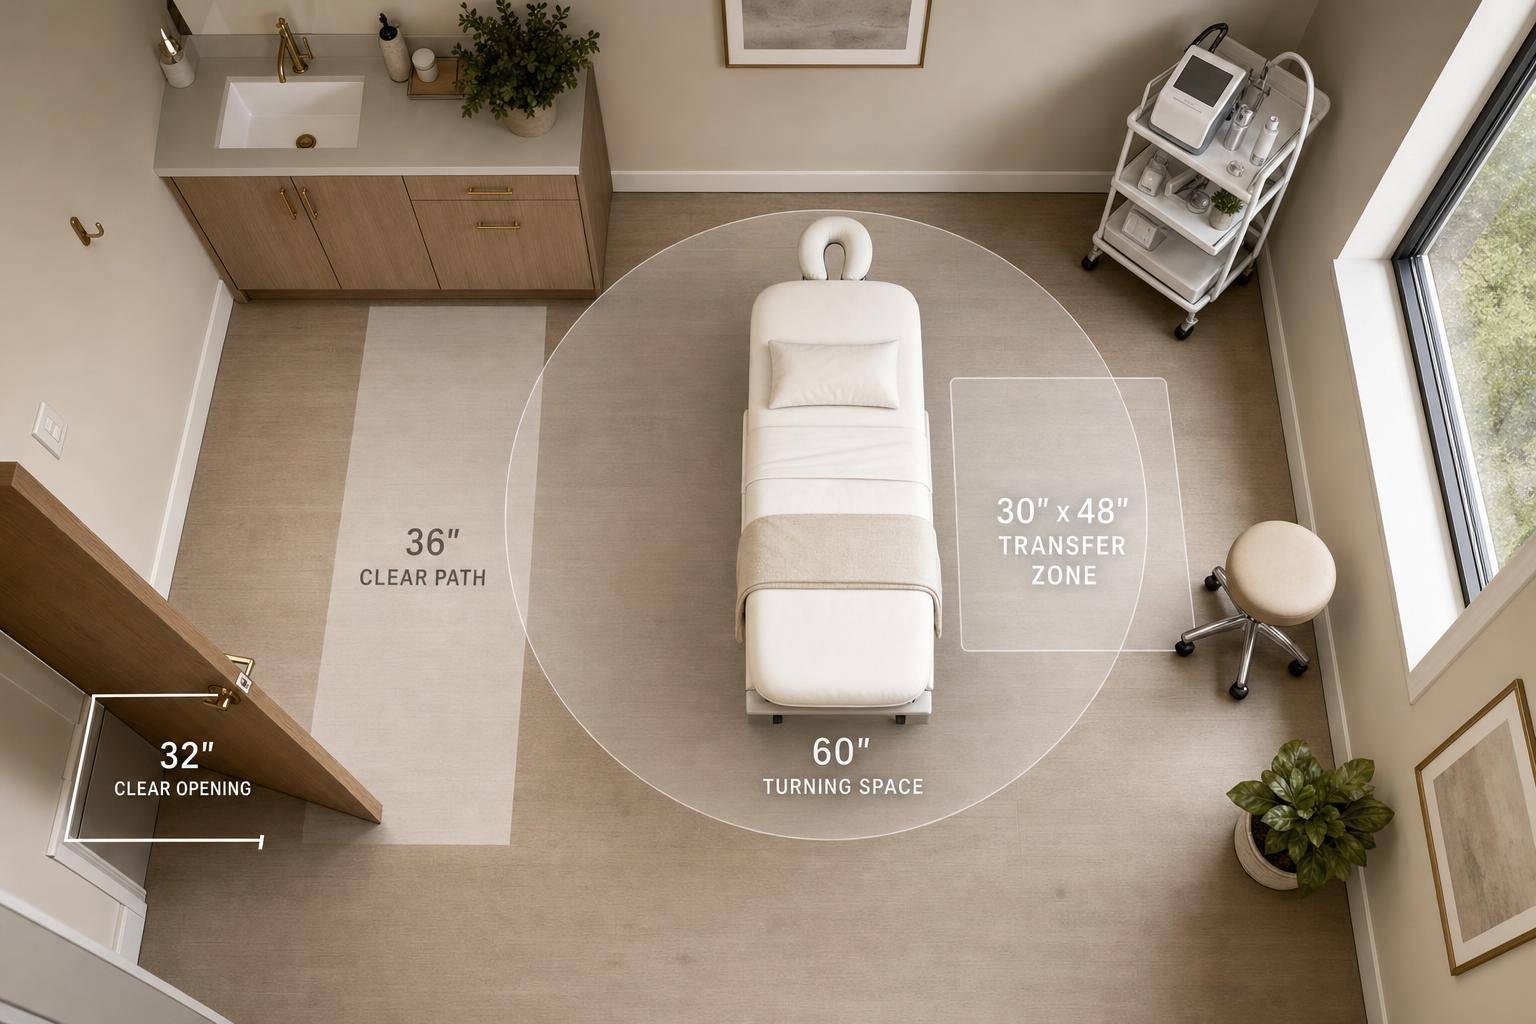

If a patient can’t get from your front door to the treatment table, the room doesn’t work under ADA rules.
I’d boil this article down to five checks: keep the patient route at least 36 inches wide, make sure the treatment-room door gives 32 inches of clear opening, leave 30 by 48 inches of open floor space beside the table, keep a 60-inch turning space open, and set the room so a patient can transfer to the table without carts, bins, or stools in the way.
Here’s the short version:
- Route to the room: at least 36 inches clear
- Door opening: at least 32 inches clear at 90 degrees
- Transfer space: at least 30 in × 48 in beside one long side of the table
- Turning space: 60-inch circle or 60 in × 60 in T-shape
- Daily setup: no storage in the route, doorway, transfer zone, or turning area
A lot of access problems come from movable items, not walls. In other words, a room can look fine on a floor plan and still fail in daily use if staff park equipment in the wrong spot.
| Item | ADA minimum | What I’d check first |
|---|---|---|
| Route to treatment room | 36 in | Carts, stools, racks, bins in the path |
| Door clear opening | 32 in | Actual opening with door at 90 degrees |
| Space beside table | 30 in × 48 in | Clear side-approach area for transfer |
| Turning space | 60 in | Door swing or equipment blocking the turn |
If I were reviewing a med spa room fast, I’d start with those four measurements and then check whether the setup stays clear during normal business hours.
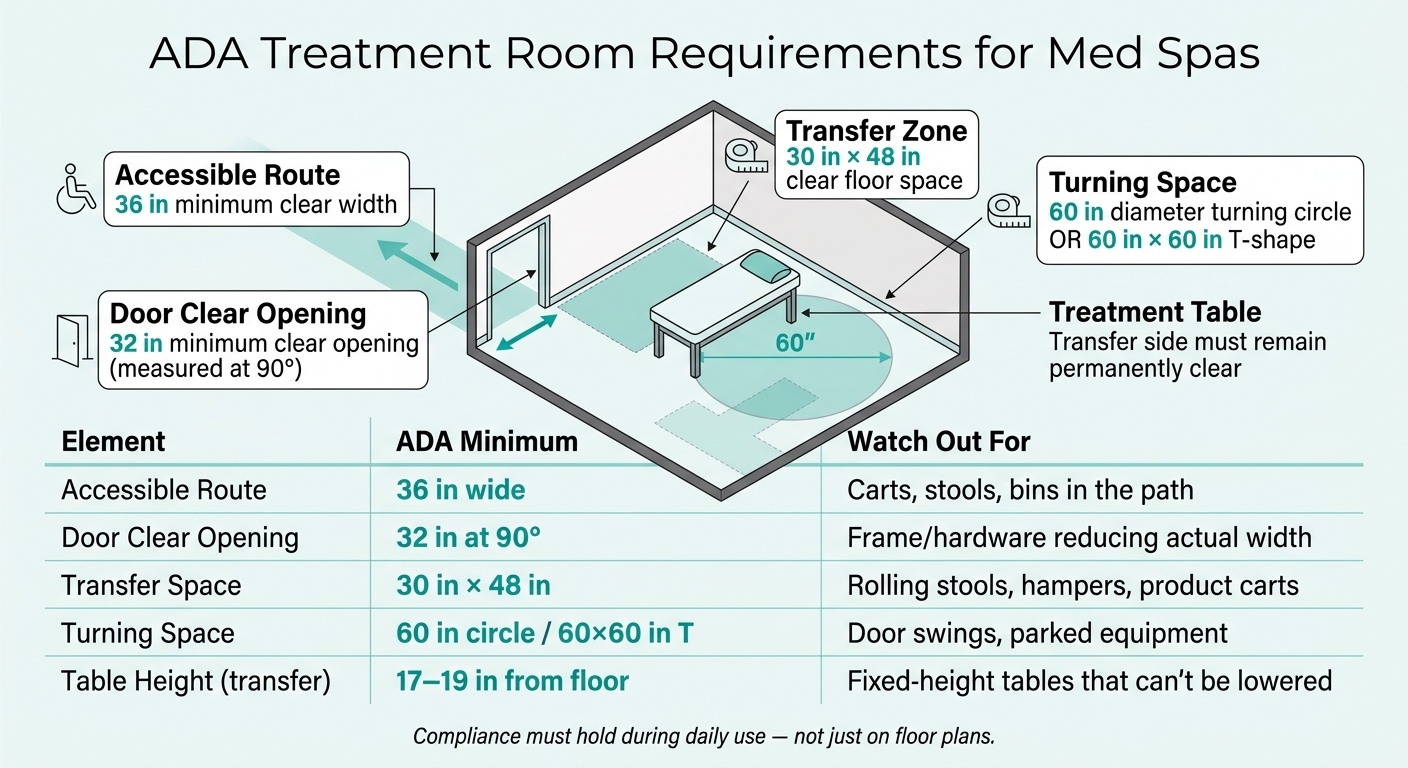
ADA Treatment Room Requirements: Key Measurements at a Glance
1. The access problem: patients need a clear path from entry to the treatment room
Patients need a direct, usable path from the front door to the treatment table. That path is the first thing to fix because if someone can’t get through the space, the rest of the visit breaks down fast.
Accessible route from reception to the treatment area
The ADA requires one continuous, unobstructed route from the public entrance through reception, corridors, and treatment rooms. For a med spa, that means the route must remain at least 36 inches wide during normal business hours and follow the same public path patients use to come in - not a back hallway or service entrance.
Common med spa obstacles that block access
In most med spas, access issues come from day-to-day setup, not big construction flaws. The usual blockers are carts, stools, hampers, product racks, bins, and decor that shrink the route. It only takes one tight spot to stop a wheelchair user, even when the rest of the path looks fine.
The fix is pretty simple: keep the patient path clear at all times. A good way to do that is to assign set storage spots for mobile equipment so it doesn’t drift into the route, and keep those items outside the 36-inch corridor.
Once the path is open, the next thing to check is the treatment-room doorway.
sbb-itb-02f5876
2. Doorway fixes: meeting the 32-inch clear opening requirement
The door to a treatment room needs to provide at least 32 inches of clear opening when it’s open to 90 degrees. That measurement is taken from the face of the door to the opposite stop with the door held at a 90-degree angle. The key point here is simple: check the actual opening, not just the size printed on the door label.
How to measure the clear opening at a treatment-room door
A 36-inch door will often leave about 32 to 34 inches of clear opening after the frame and hardware are in place. A 32-inch nominal door, on the other hand, will often end up under the required clear width once those same parts are added.
To check it, open the door fully to 90 degrees and measure at handle height from the door face to the opposite stop. Do this during build-out, during any remodel, and before signing a lease. That way, if the opening comes up short, you can fix it before construction is locked in.
It’s also smart to check for anything that stops the door from reaching a full 90-degree swing. Wall-mounted hardware like card readers, bumpers, and closers can cut into the opening if they’re in the way. If needed, move them so the door can open all the way to 90 degrees.
Entry layout changes that improve maneuvering space
The ADA also requires space to approach and open the door. In plain English, that means enough room for a wheelchair user to get to the door, use the handle, and pass through without help from staff. On the pull side, that usually means about 60 inches of clear floor depth and at least 18 inches of latch-side clearance. On the push side, about 48 inches of clear floor depth is needed, plus any latch-side clearance required by the hardware.
This is where layouts often go sideways. Cabinets, slim console tables, laundry bins, and parked equipment placed within 18–24 inches of the latch side can make the door hard to use for someone in a wheelchair, even if the opening itself still meets the 32-inch rule.
Treat the doorway area as part of the accessible route, not as spillover storage. A simple way to handle this is to mark the area around the door as a no-storage zone and build that into the room’s day-to-day setup.
Once the doorway works, check the clear floor space inside the room.
Reading about the problem? See how Prospyr solves it in one platform.
Book a Demo3. Clear floor space and turning space inside the treatment room
Once the doorway works, the room still needs to support two basic movements: transfer and turning.
30 by 48 inches of clear floor space beside the treatment table
The ADA requires at least 30 inches by 48 inches of clear floor space next to the accessible treatment table, set up for a side approach. In plain terms, that space should sit beside one long side of the table so a wheelchair can pull up close for a direct side transfer.
A common slip-up is letting rolling stools, product carts, linen hampers, or step stools wander into that 30 × 48 area. Since those items can be moved, staff may not see them as a compliance problem. But if that space is usually taken up, it isn't accessible in practice.
The simple fix is to give every movable item a set storage spot outside the transfer zone. Treat the 30 × 48 area as no-parking space for equipment.
That setup also has to leave enough room for a full wheelchair turn.
60-inch turning space that stays clear of doors and equipment
A wheelchair user needs room to enter, reposition, line up with the table, and head back out. That means providing either a 60-inch diameter circular turning space or a 60-inch by 60-inch T-shaped turning space that allows a wheelchair to make a 180-degree turn.
The T-shaped option can work better in tighter rooms because it uses a straighter footprint. But there's a catch: it needs careful planning. Every arm of the T must stay clear of door swings, built-in cabinets, and any nearby parked equipment. The 60-inch circle is easier to picture and check, though it can be tougher to keep open in rooms packed with movable devices.
Either way, the turning space has to stay open during normal business hours. A door that swings into the area, or a mobile device parked on the edge of the circle, can wipe out usable space even when the room looks compliant on paper.
Here’s a quick reference for the core ADA dimensions used in treatment-room planning:
| Element | ADA Minimum | What It Means in Practice |
|---|---|---|
| Clear floor space | 30 in × 48 in | Adjacent to one long side of the accessible table; keep movable items out of the zone |
| Turning space (circle) | 60 in diameter | A fully open circle that remains unobstructed by door swings or equipment |
| Turning space (T-shape) | 60 in × 60 in, 36 in arms | Each arm must stay clear; useful in narrower rooms |
These zones also need to be firm, stable, slip-resistant, and no steeper than 1:48.
Next, equipment placement must preserve the transfer path to the table.
4. Transfer access and equipment placement: keeping the table reachable
With the turning area set, the next piece is simple: keep a clear side-approach space next to the treatment table.
Placing treatment tables, carts, and bins without blocking transfer
Keep carts, bins, stools, and other mobile items out of the 30-by-48-inch transfer zone and away from the transfer side of the table. A good rule of thumb is to park mobile equipment on the non-transfer side or along the far wall. Sharps containers should go on the head wall or the non-transfer side, not in the approach path. Linen hampers and trash bins work best near the door or behind the provider workstation.
One setup tends to save time day after day: pick one transfer side and keep it permanently open. That means no fixed cabinetry, no wall-mounted items, and no large equipment on that side. Build the rest of the room around that choice. If the room is big enough, leaving both long sides open is even better, since some patients can transfer from only one side.
Adjustable-height treatment tables make this much easier in practice. A table that lowers to 17–19 inches above the floor supports safer transfer positioning and makes side transfers more workable. Staff should lower the table before a patient who uses a mobility device comes in, then bring it back up to a working height after the patient is in place.
Staff checklists for keeping accessible space clear
Even a good room layout can fall apart during a busy day. That’s why daily reset routines matter.
Use opening and reset checklists so specific staff members own these steps. Before the first patient, clear the 30-by-48-inch transfer space, open the turning area, and lower the table to transfer height. After each visit, return carts, bins, and stools to their assigned spots.
A simple workflow can help:
- Assign opening and reset checks to named staff
- Confirm the transfer zone is clear before the first patient
- Confirm it again after each visit
That way, the transfer side stays open instead of slowly turning into a storage spot.
Conclusion: An ADA room-planning checklist for med spas
ADA compliance in a med spa treatment room has to hold up in day-to-day use, not just in drawings or paperwork.
Use this checklist before lease signing, during build-out, and at daily opening. Make sure there is an accessible route from the public entrance through reception to the treatment room with at least 36 inches of clear width, a 32-inch clear door opening measured with the door open 90 degrees, 30 by 48 inches of clear floor space beside the treatment table for transfer, a 60-inch turning space or T-shaped equal free of fixed equipment and door swings, and a clear transfer side at the treatment table.
Check the room twice: once before construction and again during daily setup. Put one staff member in charge of the opening checklist before the first patient.
After any change, check the route, doorway, transfer space, and turning area again. It doesn’t take much for a room to slip out of compliance.
FAQs
Do all treatment rooms need to meet ADA rules?
Yes. Med spas generally must comply with ADA accessibility standards.
In most cases, they're treated like medical offices or similar facilities. That usually means the space needs accessible treatment rooms and restrooms so patients can use the facility without barriers.
This is a standard part of facility compliance. If a med spa doesn't meet these rules, it may run into problems with permits or a Certificate of Occupancy. For the exact local rules, check with your city or county zoning office.
What if my floor plan works but staff block the room?
If staff are clogging up the room, you're probably dealing with a workflow bottleneck, not a problem with the room itself.
The fix is pretty simple: set clear clean and dirty zones, standardize the room-turnover sequence, and keep supplies, hygiene products, and disposal containers right at the point of use. That way, staff don't have to waste time moving around the room looking for what they need.
How can I check ADA access before signing a lease?
Before you sign a lease, call your local city or county planning or building department and make sure the property meets ADA accessibility standards for a medical facility.
You’ll want to confirm the space can handle key access features, such as:
- Accessible ramps
- Doorways that are at least 32 inches wide
- Compliant restrooms with grab bars
- Treatment rooms that work for patients with disabilities
You should also get a Certificate of Occupancy after the local inspection.